

Key Takeaways
- Understand CMOS Battery Function: The CMOS battery powers the CMOS chip, storing essential BIOS settings, which can affect your laptop’s performance if issues arise.
- Know the Battery Type and Location: Most Sony Vaio laptops use a CR2032 lithium coin battery, located on the motherboard, typically accessed by removing the back panel or keyboard.
- Gather Necessary Tools: Essential tools for removal include a screwdriver set, tweezers, an anti-static wrist strap, and a flashlight to ensure a smooth and safe process.
- Follow Safety Precautions: Always power off and unplug your laptop, remove the main battery if possible, and handle all components carefully to avoid damage.
- Step-by-Step Removal Process: Ensure to thoroughly power down, access the battery compartment, and carefully remove the CMOS battery, noting its orientation for reinstallation.
- Proper Battery Replacement: Use a compatible CR2032 battery for replacement, paying attention to orientation, and confirm functionality by checking BIOS settings after reassembly.
Have you ever faced issues with your Sony Vaio laptop that just won’t go away? Sometimes, a simple reset isn’t enough, and you might need to remove the CMOS battery to clear the BIOS settings. This can sound daunting, but it’s easier than you think.
Overview of CMOS Battery in Sony Vaio Laptops
CMOS batteries power the Complementary Metal-Oxide-Semiconductor (CMOS) chip in your Sony Vaio laptop. This chip stores BIOS settings, including system time and hardware configurations. When you remove the CMOS battery, you reset these settings, which can resolve various issues related to startup or system performance.
You often need to remove the CMOS battery when experiencing persistent error messages, incorrect date and time, or BIOS configuration problems. This battery typically resembles a coin and is located on the motherboard, making it accessible with careful handling.
Here’s what to know:
- Battery Type: Most Sony Vaio laptops use CR2032 lithium coin batteries. Confirm the specific model for accurate details.
- Location: The CMOS battery’s position varies by model. Locate it by opening the laptop’s back panel or removing the keyboard.
- Duration: A typical CMOS battery lasts 2-10 years. Factors like usage patterns can affect longevity.
Understanding these aspects prepares you for the removal process. Knowing the battery type and location aids in troubleshooting and ensures a smooth experience when working on your laptop.
Tools Required for Removal
Removing the CMOS battery from your Sony Vaio laptop requires a few essential tools. Gather these items to ensure a smooth removal process.
Necessary Equipment
- Screwdriver Set: A set that includes Phillips and flathead screwdrivers makes it easier to open your laptop’s casing.
- Tweezers: Useful for gripping small components, especially if the battery sits tightly in its slot.
- Anti-Static Wrist Strap: Wearing this strap prevents static electricity from damaging your laptop’s internal components.
- Flashlight: A flashlight provides better visibility when examining the motherboard and locating the CMOS battery.
Safety Precautions
- Power Off: Always shut down your laptop and unplug it from the power source.
- Remove Battery: If your model has a removable main battery, take it out before starting the procedure.
- Ground Yourself: Touch a metal surface or wear an anti-static wrist strap to avoid static discharge.
- Handle with Care: Be gentle when working with fragile components to prevent damage.
Following these guidelines prepares you for a successful CMOS battery removal.
Step-by-Step Guide to Removing CMOS Battery
Follow these steps carefully to remove the CMOS battery from your Sony Vaio laptop.
Powering Down the Laptop
- Shut down your laptop: Ensure the device is completely powered off. Ignoring this step can cause damage.
- Unplug the power adapter: Disconnect the power cord from the laptop.
- Wait a moment: Let the laptop remain off for about 30 seconds. This ensures all residual power dissipates.
Accessing the Battery Compartment
- Flip the laptop: Position your laptop upside down on a soft surface to prevent scratches.
- Locate the screws: Identify the screws securing the back panel. They’re typically near the edges.
- Remove the screws: Use an appropriate screwdriver to carefully unscrew each one. Keep them in a safe place.
- Detach the back panel: Gently pry open the panel with your fingers or a plastic tool. Be cautious to avoid damaging clips.
Removing the CMOS Battery
- Locate the CMOS battery: Find the round, silver battery on the motherboard. In most models, it resembles a coin.
- Use tweezers: If the battery is snug in its compartment, take your tweezers and gently lift it out.
- Take note of orientation: Observe how the battery sits in the holder. This orientation is important for reinstalling.
- Remove the battery: Carefully pull the battery straight out without applying excessive force.
Once you’ve removed the CMOS battery, you can proceed with any necessary replacements or adjustments. Follow the reinstallation process in reverse to put your laptop back together.
Replacing the CMOS Battery
Replacing the CMOS battery is a straightforward process. Follow these guidelines to ensure a smooth transition from the old battery to a new one.
Recommended Products

We use high quality battery,manufactured by Japanese battery giant to produce the CMOS battery.

Voltage: 3V; Capacity: Diameter: 20.5mm, Height: 6.5mm. Connector: CR2032-MX51021.
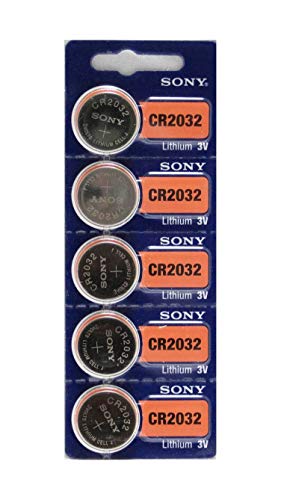
CR2032 Coin Type Lithium Batteries
Choosing the Right Replacement
Select a CR2032 lithium coin battery as your replacement. This battery type is compatible with most Sony Vaio laptops. Check your laptop’s manual, as some models might require a specific brand or additional specifications. Purchase the battery from a reputable electronics store or online retailer to guarantee quality. If possible, compare prices to find the best deal.
Installing the New Battery
Installing the new CMOS battery involves a few simple steps:
- Prepare the workspace. Ensure you’re working in a static-free environment. Use an anti-static wrist strap to ground yourself.
- Insert the battery. Place the new CR2032 battery into the slot where the old one was located. Be attentive to the orientation; the positive (+) side should face up.
- Reassemble the laptop. Align the back panel and secure it by reinserting the screws. Tighten them carefully to avoid damaging the casing.
- Reconnect power. Plug in your laptop and power it on. You’ll likely need to enter the BIOS settings to reconfigure any custom settings.
- Check functionality. Verify the date and time display in the BIOS. If they’re correct, your battery replacement succeeded. Restart the laptop to ensure everything functions seamlessly.
These steps ensure a successful installation, restoring proper functionality to your Sony Vaio laptop.
Conclusion
Removing and replacing the CMOS battery in your Sony Vaio laptop can be a straightforward process that helps resolve various issues. With the right tools and a bit of patience, you can tackle this task confidently.
Remember to take the necessary safety precautions and follow the steps carefully to ensure everything goes smoothly. Once you’ve replaced the battery, checking the BIOS settings will confirm that you’ve successfully cleared any lingering problems.
You’ll not only have a functioning laptop but also gain a sense of accomplishment. Happy troubleshooting!
Frequently Asked Questions
What is the role of the CMOS battery in a Sony Vaio laptop?
The CMOS battery powers the CMOS chip, which stores vital BIOS settings such as system time and hardware configurations. This ensures the laptop retains important information even when turned off.
Why should I replace the CMOS battery?
Replacing the CMOS battery can resolve various issues like persistent error messages, incorrect date and time, or BIOS configuration problems. A failing battery can lead to these frustrating complications.
What type of battery do I need for my Sony Vaio laptop?
You will need a CR2032 lithium coin battery for CMOS replacement. This is the standard battery type found in most Sony Vaio laptops.
How long does a CMOS battery last?
The lifespan of a CMOS battery typically ranges from 2 to 10 years, depending on usage and laptop model. Regular checks can help identify when a replacement is necessary.
What tools do I need to remove the CMOS battery?
To remove the CMOS battery, you will need a screwdriver set, tweezers, an anti-static wrist strap, and a flashlight to assist in accessing the battery compartment.
What safety precautions should I take before replacing the CMOS battery?
Before starting, ensure the laptop is powered off, unplugged, and the main battery is removed if applicable. Ground yourself to prevent static discharge, and handle all components carefully.
How do I remove the CMOS battery from my Sony Vaio laptop?
First, power down the laptop and unplug it. Access the battery compartment, locate the CMOS battery, gently remove it, and note its orientation for reinstallation.
How do I install the new CMOS battery?
Prepare a static-free workspace, insert the new CR2032 battery in the same orientation as the old one, reassemble the laptop, and reconnect the power supply to complete the installation.
How can I verify that the battery replacement was successful?
Check the date and time in the BIOS after replacing the CMOS battery. If they are correct and no error messages appear, the battery replacement was successful.
