

Key Takeaways
- Battery Types: Understand the two main battery types in ASUS Chromebooks—Lithium-Ion (Li-Ion) for longer usage times and Lithium Polymer (Li-Po) for their slim design and high energy density.
- Safe Removal Procedures: Following proper battery removal techniques is crucial to prevent damage to both the battery and your Chromebook’s internal components, ensuring user safety.
- Preparation is Key: Gather necessary tools like a Phillips screwdriver, plastic pry tool, tweezers, and an anti-static wrist strap to facilitate an efficient battery removal process.
- Safety First: Always power down the device, disconnect it from power, and wear protective gear while removing the battery to minimize electrical hazards and personal injury.
- Step-by-Step Guide: Carefully follow the systematic steps for battery removal, including powering down the device, opening the casing, disconnecting the battery, and finally removing it safely.
- Troubleshooting Tips: Be mindful of common issues such as stuck batteries or signs of damage, and handle them with care to prevent further complications or hazards.
Have you ever found yourself needing to remove the battery from your Asus Chromebook but weren’t sure how to go about it? You’re not alone. Many users face this situation, whether it’s to replace a faulty battery or to troubleshoot power issues.
Understanding how to safely remove the battery can save you time and frustration. This article will guide you through the steps, making the process simple and straightforward. With easy-to-follow instructions, you’ll be able to handle your Chromebook with confidence and get back to what matters most.
Understanding Your ASUS Chromebook Battery
Your ASUS Chromebook battery plays a crucial role in the device’s performance. Knowing its types and the proper removal process is essential for maintenance and troubleshooting.
Types of Batteries in ASUS Chromebooks
- Lithium-Ion (Li-Ion): Most ASUS Chromebooks use lithium-ion batteries due to their high energy capacity and lightweight design. These batteries provide longer usage times and recharge quickly.
- Lithium Polymer (Li-Po): Some models feature lithium polymer batteries, which offer a slim profile and flexibility in shape. They also deliver high energy density but can be more sensitive to temperature extremes.
Importance of Proper Battery Removal
- Prevents Damage: Following proper removal techniques helps avoid damage to the battery and internal components of your Chromebook.
- Safety First: Improper removal can lead to battery punctures, leaks, or even fires. Understanding correct methods ensures your safety.
- Optimize Performance: Regular battery checks and replacements enhance battery life. Removing the battery properly facilitates easy replacements when necessary.
Preparing for Battery Removal
Preparing for battery removal involves gathering tools and ensuring safety. Follow these steps to make the process straightforward and efficient.
Recommended Products

Kaisi 20 pcs opening pry tools kit for smart phone,laptop,computer tablet,electronics, apple watch, iPad, iPod, Macbook, computer, LCD screen, battery and more disassembly and repair

🌈【Wide Application & Universal】: This 22 in 1 opening pry tools set is designed for assemble or disassemble all your electric devices. Suitable for iPhone 14 13 12 11 Pro Max / XS / XR / X / 8 Plus / 7 Plus / 7 / 8 / 6S / 6S Plus, iPad, iPod, android phone, laptop, tablet, smartwatch, Macbook, computer, LCD screen, battery, camera, game consoles, speaker and more. Whether you're a professional or a amateur, this set can repair anything you need.
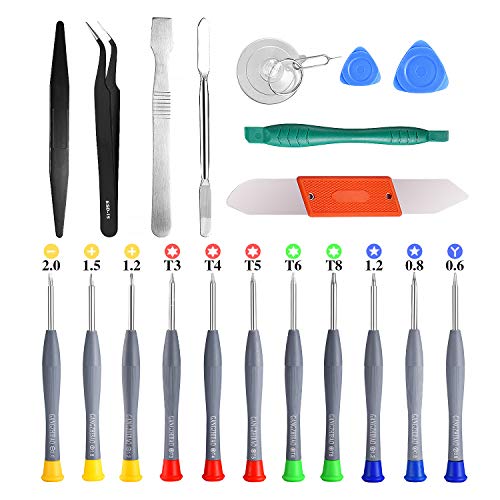
PentalobeScrewdriver Set: p5 Pentalobe screwdriver,PH000 Phillips Screwdriver, Pentalobe T5 Pentalobe T6 Screwdrivers Repair Tool Kit for Apple MacBook Mac Retina Pro Air,T5 for Macbook air & pro repair, it can remove fan screws, including SSD or hard disk replacement. The improved T5 has curved corner tip, which are different from the previous straight corner tip, It will not damage the screws and is more durable
Necessary Tools and Equipment
- Screwdriver: Use a Phillips head screwdriver appropriate for small electronics. This tool allows access to battery compartments securely.
- Plastic Pry Tool: A plastic pry tool prevents damage to the Chromebook’s casing during battery removal. This tool helps to separate components without scratching.
- Tweezers: Use tweezers for handling small screws or connectors. They offer better control in tight spaces.
- Anti-Static Wrist Strap: Wearing this strap prevents static electricity from damaging internal components. It’s a simple but effective precaution.
- Clear Workspace: Ensure you have a clean, flat surface for organizing your tools and screws. This keeps everything in order and reduces the risk of losing parts.
Safety Precautions to Consider
- Power Down the Device: Completely shut down your Chromebook before starting any work. This prevents electrical hazards and data loss.
- Disconnect from Power: Unplug the charger to eliminate any power source. A dead battery eliminates the risk of electric shock.
- Wear Protective Gear: Consider wearing safety goggles and gloves to protect against any potential battery leaks or debris.
- Handle with Care: Avoid puncturing the battery and handle it gently. Damaging the battery can cause harmful chemicals to leak.
- Work in a Ventilated Area: Ensure proper airflow to minimize inhaling any harmful fumes. This is particularly important if the battery shows signs of damage.
By gathering the right tools and taking necessary precautions, you prepare yourself for a safe and effective battery removal process.
Step-by-Step Guide on How to Remove Battery from ASUS Chromebook
Follow these steps for a safe and efficient battery removal.
Powering Down Your Device
Power down your ASUS Chromebook completely. Ensure it’s not plugged in. Disconnect any peripherals, like USB drives or external displays. This minimizes risks during battery removal.
Opening the Chromebook Casing
Use a Phillips head screwdriver to remove the screws from the back panel of the Chromebook. Be sure to keep track of the screws in a small bowl to avoid losing them. Use a plastic pry tool to gently lift the panel off, taking care not to damage the clips that hold it in place.
Disconnecting the Battery
Locate the battery connector on the motherboard. Gently unplug it using tweezers or your fingers. Wiggle it slightly to avoid any damage. Ensure you handle the connector carefully to prevent bending any pins.
Removing the Battery
Once the battery is unplugged, locate any screws securing it in place. Remove these screws with the Phillips head screwdriver. Grip the edges of the battery and lift it out carefully. Be cautious of any adhesive used to keep it in place; if the battery feels stuck, gently wiggle it until it releases.
Troubleshooting Common Issues
Removing a battery from your Asus Chromebook can sometimes present challenges. Below are some common issues you might encounter and how to address them effectively.
Recommended Products

【Compatible Models】 Asus Zenwatch 2 WI501QF.Please check your old battery number before buying this battery.

【Specifications】Model: C21N1530. Type: Li-ion. Voltage: 7.6V. Capacity: 38Wh 5000mAh. Up to 1000 recharge cycles over the life of the battery. Brand New Grade A cell battery, all Vanpir batteries are certified by UL / CE / FCC / RoHS for safety.
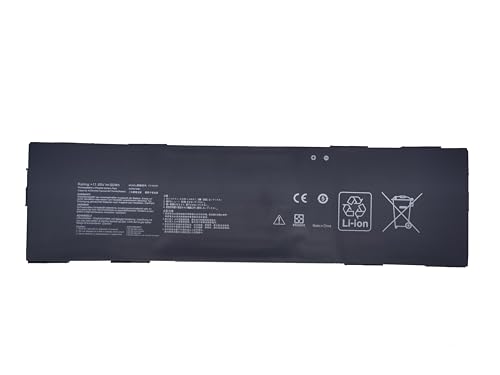
Battery Type: Li-ion; Voltage: 11.55V ; Capacity: 4335mAh/50Wh
What to Do If the Battery Won’t Come Out
If the battery won’t detach easily, first check for any screws you may have missed. Make sure you’ve removed all the securing screws, as some batteries have additional fasteners. If the battery seems stuck, gently wiggle it while lifting to help release any pressure. If any adhesive is present, apply a plastic pry tool in the seams carefully to break the bond without damaging the battery or the casing. Avoid using excessive force, as this could lead to battery damage or harm internal components.
Identifying Battery Damage
Look for signs of battery damage before proceeding with removal. Bulging, leaks, or corrosion on the battery terminals indicate potential issues. If you notice any of these problems, handle the battery with extra care. Don’t attempt to reuse a damaged battery. Instead, replace it immediately to avoid risks, such as fire or system failure. When experiencing performance issues, consider checking the battery health via built-in system diagnostics or utilizing third-party software tools specifically for Chromebooks. Be proactive in addressing any signs of degradation to maintain optimal device performance.
Conclusion
Removing the battery from your Asus Chromebook can be a straightforward process when you know what to do. By following the right steps and taking necessary precautions, you can tackle this task with confidence.
Remember to always prioritize safety and handle the battery with care. Regular maintenance can keep your device running smoothly and extend its lifespan. Don’t hesitate to reach out for help if you encounter any issues along the way. With the right approach, you’ll have your Chromebook back in top shape in no time. Happy tinkering!
Frequently Asked Questions
How do I safely remove the battery from my Asus Chromebook?
To safely remove the battery, first, power down the device and disconnect it from any power source. Gather necessary tools like a Phillips head screwdriver, a plastic pry tool, and wear protective gear. Carefully open the casing, remove any screws, and gently disconnect the battery from the motherboard before lifting it out.
What types of batteries are used in Asus Chromebooks?
Asus Chromebooks typically use either lithium-ion (Li-Ion) or lithium polymer (Li-Po) batteries. Both types are known for their reliability but differ in size, weight, and energy density. Understanding which type your Chromebook uses can help with replacements and optimizations.
What should I do if the battery won’t detach easily?
If the battery won’t detach, check for any missed screws that might be holding it in place. You can use a plastic pry tool to gently break any adhesive bonds. Always handle the battery with care to avoid damage.
What precautions should I take before removing the battery?
Before removing the battery, ensure the Chromebook is powered down and unplugged. Wear protective gear like an anti-static wrist strap, work in a ventilated area, and handle the battery carefully to avoid punctures or leaks.
How can I check the health of my Asus Chromebook battery?
You can check the battery health through the built-in diagnostics in your Chromebook’s settings. Additionally, there are third-party tools available that provide detailed information about your battery’s performance and condition. Regular checks help maintain optimal device performance.
