

Have you ever wondered how to harness the power of the sun to keep your batteries charged? With the growing interest in solar energy, many people are looking to set up their own systems. But connecting a solar charge controller to a battery can feel a bit daunting if you’re new to it.
Key Takeaways
- Understand Solar Charge Controllers: They regulate voltage and current from solar panels, preventing overcharging and optimizing battery longevity.
- Types of Controllers: Familiarize yourself with PWM (cost-effective for small systems), MPPT (maximizes energy extraction for larger systems), and hybrid controllers (compatible with multiple power sources).
- Preparation is Key: Gather essential tools and materials, including wire cutters, strippers, a multimeter, and appropriate wiring for a safe and efficient connection process.
- Follow a Step-by-Step Guide: Ensure proper connection by preparing the battery, identifying terminals, and securely connecting wires to the solar charge controller and battery.
- Troubleshoot Common Issues: Be equipped to identify and resolve issues such as inconsistent charging, overheating, and error codes by checking connections and ensuring proper settings.
- Safety First: Always wear gloves while working with batteries and ensure components are compatible to avoid accidents and damage to your solar system.
Understanding Solar Charge Controllers
Solar charge controllers manage the flow of energy from your solar panels to your batteries. They prevent overcharging and ensure your batteries operate efficiently.
What Is a Solar Charge Controller?
A solar charge controller regulates voltage and current coming from solar panels. It prevents batteries from overcharging and protects against discharging too quickly. The controller monitors battery levels and adjusts the charging process according to the specific needs of your batteries. This results in prolonged battery life and improved performance.
- PWM (Pulse Width Modulation) Controllers
- PWM controllers deliver a constant voltage to the battery, causing it to charge steadily.
- They are cost-effective and suitable for smaller systems.
- Efficiency is lower compared to MPPT controllers in high-voltage scenarios.
- MPPT (Maximum Power Point Tracking) Controllers
- MPPT controllers optimize the voltage and current from solar panels for maximum efficiency.
- They adjust to varying solar conditions, extracting more energy than PWM controllers.
- Ideal for larger setups or scenarios where roof space is limited.
- Hybrid Controllers
- Hybrid controllers combine features of both PWM and MPPT controllers.
- These controllers can manage energy from both solar and another power source, such as a generator or grid.
- They offer flexibility and can be tailored for specific energy needs.
Understanding the characteristics and functions of solar charge controllers ensures you choose the right one for your solar power system.
Tools and Materials Needed
To connect a solar charge controller to a battery, gather the right tools and materials. This preparation makes the process smoother and ensures safety.
Recommended Products
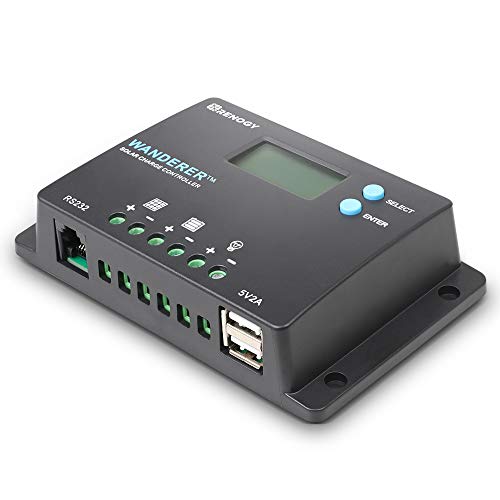
𝐒𝐦𝐚𝐫𝐭 𝟒-𝐒𝐭𝐚𝐠𝐞 12V/24V Solar Charge Controller: Renogy charge controller 𝐦𝐚𝐱𝐢𝐦𝐢𝐳𝐞𝐬 𝐁𝐚𝐭𝐭𝐞𝐫𝐲 𝐋𝐢𝐟𝐞 & 𝐒𝐨𝐥𝐚𝐫 𝐄𝐟𝐟𝐢𝐜𝐢𝐞𝐧𝐜𝐲, this advanced pwm solar charge controller utilizes intelligent 4-stage charging (Bulk/Boost/ Float/Equalization) to optimize power delivery for AGM, Gel, Flooded and Lithium batteries. RV solar charge controller prevents overcharging and gas buildup while 𝐚𝐜𝐡𝐢𝐞𝐯𝐢𝐧𝐠 𝟑𝟎% 𝐥𝐨𝐧𝐠𝐞𝐫 𝐛𝐚𝐭𝐭𝐞𝐫𝐲 𝐥𝐢𝐟𝐞𝐬𝐩𝐚𝐧 compared to basic charge controllers.
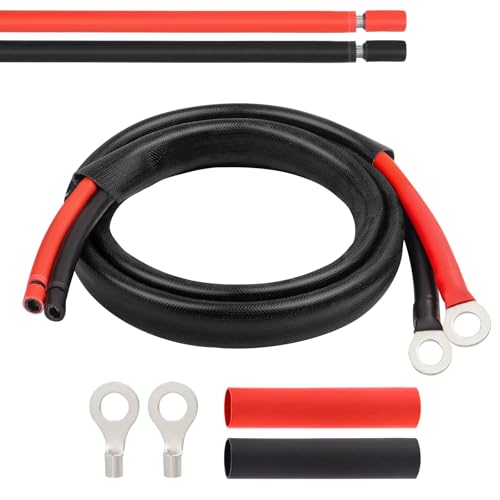
10AWG Tinned Copper Wire -- MOOKEERF solar battery cable is made of larger diameter 10AWG tinned copper wire which is minimize power loss in solar panel systems, the inner conductor consists of 84 tin-plated copper, well constructed and good conductive.

Required Tools
- Wire Cutters: Use these to cut wires to the needed lengths.
- Wire Strippers: Stripping wires enables clear connections.
- Screwdriver: A flat-head or Phillips screwdriver is essential for securing connections.
- Multimeter: This tool checks battery voltage and ensures connections are correct.
- Wrench: A small adjustable wrench helps tighten any terminal connections.
- Solar Charge Controller: Choose the right type based on your system (PWM, MPPT, or hybrid).
- Battery: Use a compatible battery for your solar setup, ensuring it meets voltage requirements.
- Wiring: Obtain appropriate gauge wire for your system to ensure efficient energy transfer.
- Connectors: Use terminal connectors or ring terminals for secure connections to terminals.
- Fuses: Install fuses to protect your system from overloads and ensure safety.
Step-by-Step Guide to Connect Solar Charge Controller to Battery
Connecting a solar charge controller to a battery requires careful steps for optimal performance. Follow this guide to ensure a successful setup.
Recommended Products

✔️【Waterproof Solar Charge Controller】IP67 waterproof, suitable for outdoor use. Automatically identify voltage, 12V Max power: 150W, 24V Max power: 300W. The maximum current is 10A. Compatible with various 12V/24V deep-cycle batteries, such as AGM, GEL, Flooded. Adopting brand MCU chips to realize fast intelligent control and ultra-low standby power consumption.

12V Battery Compatibility + 20A PWM Charging: Designed specifically for 12V solar systems, this 20A PWM solar charge controller is compatible with LiFePO4, AGM and Gel batteries and supports solar panels up to 300W. The upgraded 20A design provides stable current management for everyday RV, marine, camping and off-grid solar applications. Not compatible with 24V/36V battery systems

Preparing the Battery
Check the battery type. Make sure it matches the specifications of your solar charge controller. If using a lead-acid battery, verify that it’s fully charged before starting. Clean the battery terminals to ensure a solid connection. Use a wire brush if needed. Always wear gloves for safety.
Connecting the Charge Controller to the Battery
Identify the battery terminals: positive (+) and negative (-). Use red wires for positive connections and black wires for negative connections. Connect the positive wire from the charge controller to the positive terminal on the battery. Then connect the negative wire from the charge controller to the negative terminal on the battery. Ensure all connections are tight to prevent any power loss.
Testing the Connection
Use a multimeter to check the voltage at the battery terminals. Confirm that the voltage matches the expected output for your battery type. Turn on the solar charge controller to observe its display. Look for indicators that show proper charging status. If you notice any error messages, double-check your connections. Make adjustments as needed to ensure everything functions correctly.
Following these structured steps helps facilitate a smooth connection between your solar charge controller and battery, promoting efficient solar energy use.
Common Issues and Troubleshooting
Understanding common issues can ensure a successful connection of your solar charge controller to your battery. Troubleshooting these problems can save time and prevent damage.
Identifying Connection Problems
- No Power Output: Check for any signs of power output from the solar charge controller. If there’s none, it might indicate a poor connection or a malfunctioning controller.
- Inconsistent Charging: Look for fluctuations in charging status. If the voltage readings vary widely, there could be a wiring fault or an issue with the controller settings.
- Overheating: Notice any overheating in the charge controller. This situation could stem from improper installation, overloaded circuits, or inadequate ventilation.
- Battery Not Charging: Evaluate the battery’s responsiveness. If it fails to charge despite proper wiring, the battery might be faulty or incompatible.
- Error Codes: Reference the charge controller display for any error codes. These codes pinpoint specific malfunctions or misconfigurations.
- Check Connections: Verify all wiring and connections. Ensure positive and negative wires match the correct terminals on both the controller and battery, tightening any loose connections.
- Inspect the Charge Controller: Examine the controller for any visible damage or indications of wear. Replace it if necessary, and ensure it’s rated for your system’s voltage and current.
- Test Voltage and Settings: Use a multimeter to measure voltage output. Adjust settings on the charge controller as needed, matching them to your battery type and specifications.
- Monitor Temperature: Ensure the charge controller has adequate ventilation. If overheating occurs, relocate it to a cooler area or modify its mounting for better airflow.
- Replace Faulty Components: If the battery isn’t holding a charge, test it independently. Replace it if it shows signs of wear or failure.
Employing these tips helps build a reliable solar energy system. Avoiding common pitfalls leads to an efficient setup.
Conclusion
Connecting a solar charge controller to your battery doesn’t have to be daunting. With the right tools and a clear understanding of the process you can set up your solar energy system with confidence. Remember to take your time during each step and double-check your connections to ensure everything runs smoothly.
If you encounter any issues don’t hesitate to refer back to the troubleshooting tips. They can help you quickly resolve any hiccups along the way. Embracing solar energy is a fantastic step towards sustainability and efficiency and you’re well on your way to enjoying the benefits it brings. Happy solar charging!
Frequently Asked Questions
What is a solar charge controller and why is it important?
A solar charge controller regulates the voltage and current from solar panels to batteries. It prevents overcharging and ensures efficient energy flow, which prolongs battery life and enhances performance.
What types of solar charge controllers are available?
There are three main types of solar charge controllers: PWM (Pulse Width Modulation) for small systems, MPPT (Maximum Power Point Tracking) for larger setups, and hybrid controllers that combine features of both for flexible management.
What tools do I need to connect a solar charge controller to a battery?
You will need wire cutters, wire strippers, a screwdriver, a multimeter, and a wrench. These tools facilitate a safe and effective connection between your charge controller and battery.
How do I prepare my battery before connecting it to a solar charge controller?
Ensure your battery is the correct type and fully charged. Clean the terminals to provide a solid connection, preventing power loss during operation.
What steps should I follow to connect my solar charge controller to a battery?
Connect the charge controller’s positive wire (red) to the battery’s positive terminal and the negative wire (black) to the negative terminal. Ensure tight connections and test for proper voltage with a multimeter.
How can I troubleshoot issues with my solar charge controller?
Check all connections, inspect the controller for damages, verify voltage settings, and monitor the temperature. Replace faulty components if necessary to resolve issues like no power output or inconsistent charging.
