
Have you ever thought about harnessing the sun’s power to charge your devices? With rising energy costs and a growing focus on sustainability, making your own solar panel can be a game changer. Imagine being able to charge your battery without relying on traditional electricity sources.
Key Takeaways
- Understanding Solar Panels: Solar panels convert sunlight into electrical energy using photovoltaic (PV) cells, essential for charging batteries effectively.
- Essential Materials: Key components for building a solar panel include PV cells, a sturdy base, protective cover, diodes, wiring, a charge controller, and a rechargeable battery.
- Step-by-Step Assembly: Design the solar panel layout, securely assemble components, and connect the panel to the battery through a charge controller to regulate the charging process.
- Optimal Positioning: Ensure the solar panel is angled correctly towards the sun to maximize energy capture, adjusting for seasonal changes in sunlight.
- Regular Maintenance: Inspect connections and clean the panel regularly to maintain efficiency. Test system performance periodically to identify any issues early.
- Battery Care: Keep the battery charged to around 80% and avoid complete discharges for longevity, ensuring sustainable energy use.
Understanding Solar Panels
Solar panels harness sunlight to generate electricity. This section covers what they are and how they work to help you understand their importance in charging batteries.
What Are Solar Panels?
Solar panels are devices that convert sunlight into electrical energy. They consist of photovoltaic (PV) cells, typically made from silicon. These cells capture sunlight and produce direct current (DC) electricity. Common types of solar panels include monocrystalline, polycrystalline, and thin-film panels. Each type varies in efficiency, cost, and application, allowing you to choose the best option for your charging needs.
How Do Solar Panels Work?
Solar panels function through a straightforward process. When sunlight strikes the PV cells, it excites electrons, creating an electric current. This current flows through wires and connects to a battery or electrical circuit.
- Sunlight Absorption: PV cells absorb sunlight and generate electron movement.
- Electric Current Generation: The excited electrons create a flow of electricity.
- Energy Storage: The produced electricity can charge batteries for later use.
Understanding this process helps you appreciate the efficiency of solar energy. Depending on factors like sunlight intensity and panel angle, energy output can vary. Knowing how to optimize panel placement enhances charging performance.
Materials Needed
Creating a solar panel to charge a battery requires specific materials and tools. Gathering these components early ensures a smoother assembly process.
Essential Components
- Photovoltaic Cells: These are the heart of your solar panel, converting sunlight into electricity. You’ll need multiple cells depending on your desired power output.
- Plywood or a Similar Base: This provides structural support. Choose a piece that’s durable yet lightweight for easy handling.
- Glass or Clear Plastic: Use this to cover the panel and protect the photovoltaic cells from the elements while allowing sunlight through.
- Diodes: Prevent reverse current flow during nighttime or low-light conditions. Use blocking diodes to protect your battery.
- Wiring: Obtain gauge wire suitable for your design. Thicker wires can minimize energy loss.
- Battery: Select a rechargeable battery that matches your panel’s output, such as a lithium-ion or lead-acid battery.
- Charge Controller: This regulates the voltage and current coming from the solar panel to the battery.
- Rivets or Screws: Use these for securing components to the base. Select materials that resist corrosion.
- Soldering Iron: Essential for connecting wires to photovoltaic cells and components securely.
- Screwdriver: Necessary for fastening the base and securing components.
- Wire Strippers: This tool helps prepare wires for connections and ensures clean contacts.
- Multimeter: Offers measurements for voltage and current, assisting with troubleshooting and ensuring proper setup.
- Drill: Use this for creating holes in the base for wires and securing components.
- Safety Gear: Always wear safety goggles and gloves during assembly to protect yourself from debris and sharp edges.
Gathering these materials and tools supplies the foundation for building a functional solar panel. Prepare each component before starting your project for a more efficient process.
Step-by-Step Guide
Follow these steps to create a solar panel that efficiently charges a battery.
Designing Your Solar Panel
Designing a solar panel begins with determining the size and layout. Choose photovoltaic cells based on the desired power output. Each cell typically outputs around 0.5 volts. A standard 12V battery requires at least 36 cells connected in series to reach the necessary voltage. Plan your design on a piece of paper or software, sketching the dimensions and locations of the cells. Ensure to consider spacing for wires and connectors.
Assembling the Components
Start assembling by laying the durable base, such as plywood, on a flat surface. Secure the photovoltaic cells to the base using a strong adhesive. Use a soldering iron to connect the cells in series, ensuring that positive terminals connect to negative terminals. Add diodes to prevent backflow of electricity. Once all cells are connected, place the protective glass or clear plastic on top to shield against the elements. Maintain proper sealing to ensure longevity.
Connecting to a Battery
After assembling the solar panel, it’s time to connect it to the battery. Install a charge controller between the solar panel and the battery to regulate the charging process. Connect the solar panel’s output wires to the charge controller inputs. Next, connect the charge controller to the battery terminals, ensuring proper polarity—positive to positive and negative to negative. Finally, use a multimeter to check connections and confirm that everything works properly. Your solar panel is now ready to charge your battery independently.
Tips for Efficient Charging
Efficient charging maximizes battery life and energy use. Follow these tips to enhance the performance of your solar panel setup.
Recommended Products
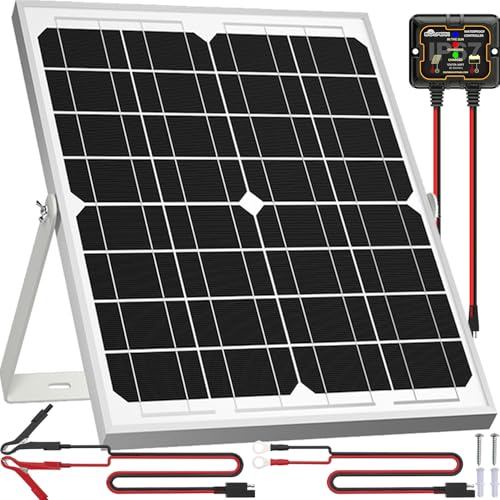
【High Conversion Rate】This 20W solar panel with monocrystalline A+ solar cell has an excellent cell efficiency of 21%-30%. Designed to charge and maintain 12V rechargeable batteries like LiFePO₄, Lithium Ion, AGM, SLA, GEL, EFB, MF, etc. Keep batteries in charged for trailer, tractor, truck, boat, motorcycle, RV, car, lawn mower, water pump, gate opener, electric fence, etc

[ 30A Solar Charge Controller ]: The solar charger controller compatible with 12V 24V system. Discharge Current: 10A,a built-in industrial micro controller, automatically manage the working of solar panel and battery in sol ar system. Dual USB output 5V/2.5A (max), to support mobile phone charging

✔️【Waterproof Solar Charge Controller】IP67 waterproof, suitable for outdoor use. Automatically identify voltage, 12V Max power: 150W, 24V Max power: 300W. The maximum current is 10A. Compatible with various 12V/24V deep-cycle batteries, such as AGM, GEL, Flooded. Adopting brand MCU chips to realize fast intelligent control and ultra-low standby power consumption.
Optimal Sunlight Exposure
Position your solar panel towards the sun for maximum efficiency.
- Aim for a south-facing angle in the Northern Hemisphere or a north-facing angle in the Southern Hemisphere.
- Adjust the tilt seasonally to capture the most sunlight. For instance, during summer, an angle of about 15-30 degrees works well, while in winter, angles between 40-60 degrees yield better results.
- Keep the panels clean and free from debris. Dust and dirt block sunlight, reducing power generation. Regularly wipe the surface to maintain clarity.
Maintenance and Care
Regular maintenance ensures reliable performance.
- Inspect the connections every few months. Loose or corroded wires reduce charging efficiency.
- Test the system with a multimeter to check voltage output. If the readings drop, it may signal issues needing immediate attention.
- Keep the battery charged to about 80% but avoid complete discharges. Lithium batteries benefit from regular partial charges, extending their lifespan.
- Store the solar panel indoors during harsh weather. Protecting it from snow, ice, or extreme temperatures prevents damage and prolongs its life.
Following these tips leads to more efficient charging of your batteries while maximizing the benefits of your homemade solar panel.
Conclusion
Creating your own solar panel to charge a battery is a rewarding project that empowers you to harness renewable energy. By understanding the components and processes involved you can efficiently produce and store energy while reducing your reliance on traditional power sources.
With the right materials tools and a bit of patience you can set up a system that not only saves you money but also contributes to a more sustainable future. Remember to keep your solar panel well-maintained and positioned for optimal sunlight to get the most out of your efforts. Enjoy the journey of going solar and the benefits it brings to your life!
Frequently Asked Questions
What are the benefits of using solar power to charge devices?
Using solar power for charging devices helps reduce electricity costs and promotes sustainability. It allows users to generate their own energy, decreasing dependence on conventional electricity sources and minimizing environmental impact.
How do solar panels work?
Solar panels work by converting sunlight into electrical energy using photovoltaic (PV) cells. When sunlight hits these cells, it excites electrons, creating an electric current that can be stored or used to power devices directly.
What materials do I need to create a solar panel?
To build a solar panel, you’ll need photovoltaic cells, a plywood base, glass or clear plastic for protection, diodes, appropriate wiring, a rechargeable battery, and a charge controller. Don’t forget tools like a soldering iron and multimeter.
Can you explain the assembly process for a solar panel?
The assembly involves designing your solar panel layout, securing the photovoltaic cells to the base, connecting them in series with a soldering iron, and integrating diodes. Finally, connect the panel to the battery with a charge controller for efficient charging.
How can I maximize solar charging efficiency?
To maximize efficiency, position the solar panel for optimal sunlight exposure and adjust its tilt seasonally. Additionally, maintain the panel by inspecting connections and keeping the battery charged to around 80% for reliable performance.