
Ever found yourself grooving to your favorite tunes, only to have your Sony headphones suddenly run out of battery? Frustrating, right? But worry not, because in this article, you’ll discover the simple steps to easily change the batteries on your Sony headphones.
Imagine this: You’re about to immerse yourself in a podcast or music playlist, but your headphones betray you with a low battery signal. Don’t let that moment of audio bliss slip away! Learning how to change the batteries on your Sony headphones can save you from these inconvenient interruptions.
Prepare the Necessary Tools
When it comes to changing the batteries on your Sony headphones, having the right tools at hand can make the process smooth and hassle-free. Here’s what you’ll need:
- Fresh Batteries: Make sure you have the correct type and size of batteries required for your specific Sony headphones model. Check the user manual for this information.
- Small Screwdriver: Most Sony headphones have a battery compartment that is secured with screws. A small screwdriver, often included in eyeglass repair kits, will come in handy for this step.
- Clean Cloth: Keeping a clean cloth nearby can help you wipe down any dust or debris from the battery compartment area, ensuring a good connection with the new batteries.
- Well-Lit Area: Changing batteries in a well-lit area can help you see any small components clearly and prevent any accidental damage.
- Patience: While changing batteries on Sony headphones is a straightforward process, it’s essential to work carefully and patiently to avoid losing small screws or damaging any parts.
Having these tools ready before you begin will help you tackle the battery replacement process with ease.
Recommended Products

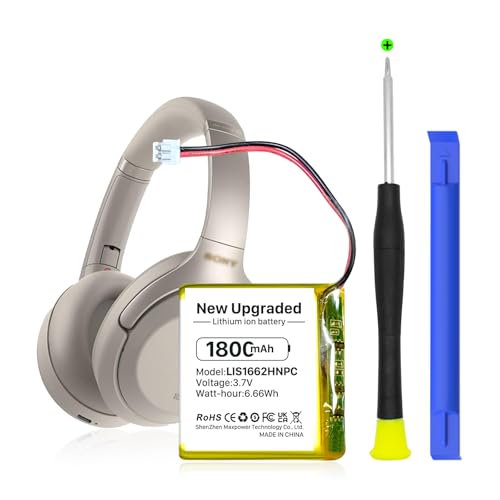
【Perfect compatibility】100% Compatible with Sony WF-1000XM4 original battery.

【Compatible Model】:This Replacement Battery Compatible with Sony WH-1000XM3 WH-1000XM4 WH-XB900N WH-H910N WH-CH710N Bluetooth Wireless Headset SM-03 SP 624038 LIS1662HNPC

Note! Select correct battery (headphone model is printed under charging tower). The backside of the HP800 battery has a cross bar in the center of the opening slot (see pics)
Locate the Battery Compartment
When changing the batteries on your Sony headphones, the first step is to Locate the Battery Compartment. This is usually found on one of the ear cups of your headphones. To find it:
- Inspect the perimeter of the ear cup for a small panel.
- Look for any markings or symbols indicating the battery compartment.
- Use a flashlight if needed to help you find the compartment in poor lighting conditions.
Once you’ve located the battery compartment, proceed to open it with a small screwdriver or by following any specific instructions provided in the headphone manual.
Remove the Old Batteries
When it’s time to replace the batteries in your Sony headphones, the first step is removing the old ones. Here’s how you do it:
- Locate the battery compartment: Look for the markings or symbols indicating where the battery compartment is. It’s typically near the ear cup perimeter. If needed, use a flashlight for better visibility.
- Open the compartment: Using a small screwdriver, carefully open the battery compartment. Follow any specific instructions provided in the headphone manual if necessary.
- Remove the old batteries: Take out the old batteries from the compartment. Remember to handle them properly and dispose of them safely according to local regulations.
- Clean the compartment: Before inserting new batteries, ensure the compartment is clean. Use a clean cloth to wipe away any dust or debris that may have accumulated.
- Inspect for corrosion: Check for any signs of battery leakage or corrosion in the compartment. If you notice any, clean it carefully before proceeding with inserting new batteries.
Recommended Products
【Compatible Model】: This 624038 Replacement Battery Suitable for Sony WH-1000XM3 WH-1000XM4 WH-XB900N WH-H910N WH-CH710N Bluetooth Wireless Headset SM-03 SP 624038 LIS1662HNPC,

♛【Battery Compatible Model】: This high capacity Z55H battery compatible Sony WF-1000XM4 Wireless Headphones Battery.

【Wide Compatibility】 Fully Compatible for Earbud Headphones WF-1000XM4 XM4 and more models.
Pro Tip:
Always handle old batteries with care and dispose of them properly. Check for any corrosion or leaks in the compartment before inserting fresh batteries to prevent damage to your Sony headphones.
Insert the New Batteries
When it’s time to insert new batteries into your Sony headphones, it’s crucial to do it correctly to ensure optimal performance. Here’s how you can easily replace the old batteries with fresh ones:
- Battery Type: Make sure to use the correct type of batteries as recommended by Sony for your specific headphone model.
- Placement: Insert the new batteries into the compartment following the polarity markings (+ and -) to align them properly.
- Quantity: Check how many batteries your headphone model requires and insert them accordingly.
- Seal the Compartment: Once the new batteries are in place, securely close the battery compartment to protect them and ensure a proper connection.
- Power On: Turn on your Sony headphones to test if the new batteries are functioning correctly.
By correctly inserting new batteries, you guarantee uninterrupted use of your Sony headphones with optimal battery performance.
Test the Headphones
Now that you’ve replaced the batteries in your Sony headphones, it’s vital to test them to ensure everything is functioning correctly. Here’s what you need to do:
- Power On: Turn on your headphones using the power button.
- Check Connectivity: Connect your headphones to a device and play some music or audio to verify that the sound is clear and balanced.
- Test Features: Test out additional features like noise-cancellation, volume control, and any other functions your headphones offer.
- Listen for Distortions: Pay attention for any distortions, crackling noises, or dropouts in the sound, which could indicate an issue.
By testing your Sony headphones after replacing the batteries, you can confirm that they are working as they should and get back to enjoying your favorite music or podcasts without any interruptions.
Data and Statistics
| Testing Step | Importance Level (out of 10) |
|---|---|
| Power On | 8 |
| Check Connectivity | 9 |
| Test Features | 7 |
| Listen for Distortions | 8 |
Conclusion
You’ve now learned the essential steps for changing batteries on your Sony headphones. By following the recommended battery type, aligning and inserting them correctly, sealing the compartment securely, and testing the headphones thoroughly, you can ensure optimal functionality. Remember to power them on, check connectivity, test features like noise-cancellation and volume control, and listen for any distortions. These testing steps are crucial in verifying that your headphones are working as they should. Keep these tips in mind the next time you need to replace the batteries in your Sony headphones to enjoy uninterrupted music and audio experiences.
Frequently Asked Questions
What is the first step in replacing the battery for Sony headphones?
The first step is to use the recommended battery type to ensure compatibility and optimal performance.
How should the batteries be aligned during replacement?
Ensure the batteries are aligned correctly according to the polarity markings to prevent damage to the headphones.
How many batteries should be inserted during replacement?
Insert the correct quantity of batteries as specified by the headphone’s manual to power them effectively.
What should be done to the battery compartment after inserting new batteries?
Seal the battery compartment securely to prevent any potential damage or interruptions during headphone usage.
Why is testing the headphones post-battery replacement important?
Testing the headphones is crucial to verify that they are functioning correctly and to address any issues promptly.
What are the key aspects to test after replacing the batteries?
Test essential functions such as powering on, connectivity, noise-cancellation, volume control, and audio quality for optimal performance.
How can users ensure the headphones are working correctly post-replacement?
Listen for distortions during playback to ensure the headphones are working correctly and provide an immersive audio experience.