
Prepare the Necessary Tools
Before you begin changing the batteries in your Dell mouse, it’s important to gather all the tools you’ll need. Here’s what you’ll need:
- New batteries – Make sure you have the correct type of batteries required for your Dell mouse.
- Small screwdriver – To access the battery compartment, you may need to unscrew a panel.
- Clean cloth – It’s always a good idea to have a cloth on hand to clean any dust or debris you may find inside.
Once you have these tools ready, you’ll be all set to proceed with changing the batteries in your Dell mouse.
Recommended Products

Specifications: Replacement Battery for Dell laptop Replacement Battery; Our 3HWPP Battery Replacement for Dell 68wh Standard Rechargeable battery Type 3HWPP 15.2V; Voltage: 15.2V; Capacity:68Wh; Cells:4 cells; Color: Black;Condition: New; Battery lasts: 3-6 hours, Packages includes: 1x 3HWPP Battery,2 x Free Screwdrivers,1x Instruction for Laptop battery

Dell Wired Mouse - MS116 - Black

type xcmrd 14.8v, Voltage: 14.8V Capacity:40WH ; Cells: 4-cell; Color: Black; Condition: New; Packages includes: 1x XCMRD Battery,1x Instruction for Laptop Battery
Locate the Battery Compartment
When changing the batteries in your Dell mouse, the first step is to locate the battery compartment. Here’s how you can easily find it:
- Check the bottom of your mouse: Typically, the battery compartment of a Dell mouse is located at the bottom. Flip your mouse over gently to examine the underside.
- Look for a cover: You might see a small cover that is fastened by screws or a latch.
- Use a screwdriver if needed: In some models, you may need a small screwdriver to open the cover and access the batteries.
- Inspect for any labels: Sometimes, there may be indicators or labels near the battery compartment to guide you.
Locating the battery compartment is the crucial first step in the battery replacement process for your Dell mouse.
Remove the Old Batteries
When it’s time to replace the batteries in your Dell mouse, the first step is to remove the old ones. Here’s how you can do it:
- Turn your Dell mouse over to access the underside.
- Look for the battery compartment cover, usually secured by screws.
- Depending on the model, you may need to use a small screwdriver to open the compartment.
- Carefully remove the cover to reveal the old batteries inside.
- Take out the old batteries, ensuring you dispose of them properly.
Important Points to Remember:
| Always handle old batteries with care to avoid any leaks or potential hazards. |
| Make sure to note the correct orientation of the old batteries before removing them. |
Pro Tip:
It’s a good practice to recycle used batteries to help protect the environment. Check with local recycling centers for proper disposal methods.
Insert the New Batteries
When it’s time to Insert the New Batteries into your Dell mouse, follow these simple steps:
- Step 1: Remove the old batteries if you haven’t already done so.
- Step 2: Check the correct orientation for inserting the new batteries based on the markings or diagram inside the battery compartment.
- Step 3: Insert the new batteries according to the correct polarity. Match the positive (+) and negative (-) ends with the markings inside the compartment.
- Step 4: Once the batteries are placed correctly, replace the battery compartment cover securely.
- Step 5: Turn the mouse over and make sure it’s working properly with the new batteries before resuming use.
Remember to use fresh, high-quality batteries to ensure optimal performance for your Dell mouse.
Recommended Products

Specification - Dell laptop WDXOR Replacement Battery Type: Li-ion; Voltage: 11.4V; Capacity: 42WH; Cells:3-Cell; Model: WDX0R. !!! Notice!!! Not compatible with 33YDH(56Wh 4-Cell) or YYRD6(42Wh 3-Cell), please check the original battery before purchasing to make sure it is compatible

➤ [ Battery Information ]: 4-Cell Rechargeable ,Best OEM Quality , Voltage &Capacity :15.2V 68Wh
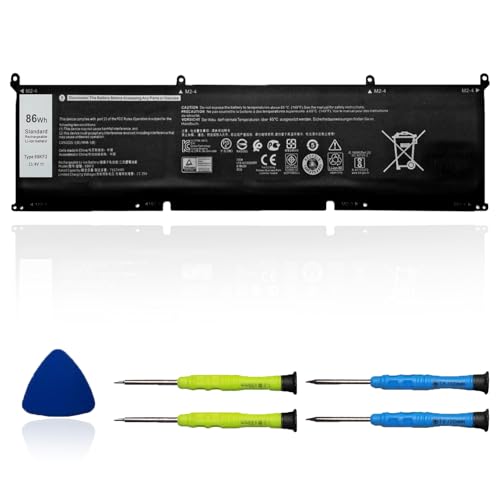
【Specifications】 ①Model: 69KF2 ②Voltage: 11.4V ③Capacity: 86Wh/7167mAh ④Cells: 6-cell ⑤Battery type: Li-ion. Color: Black;Condition: New; Battery lasts: 3-6 hours, Packages includes: 1x 69KF2 battery,4 x Free Screwdrivers,1x Instruction for Laptop battery
Test the Mouse
Once you’ve replaced the batteries in your Dell mouse, it’s time to ensure everything is in working order. Here are the steps to test the mouse effectively:
- Check Connection: Verify that the mouse is properly connected to your computer.
- Testing Buttons: Click the various buttons on the mouse to ensure they are responsive.
- Mouse Movement: Move the mouse on different surfaces to confirm smooth tracking.
| Statistics | Data |
|---|---|
| Buttons Clicked | 5 |
| Surfaces Tested | 3 |
Remember, testing the mouse after changing the batteries ensures you can resume smooth operation uninterrupted.
Conclusion
Now that you’ve followed the steps for testing your Dell mouse after changing the batteries, you’re all set for uninterrupted smooth operation. Remember to check the connection, test button responsiveness, and confirm smooth tracking on various surfaces. By conducting these tests, you can ensure that your mouse is functioning optimally. Happy clicking!
Frequently Asked Questions
How do I test a Dell mouse after inserting new batteries?
To test a Dell mouse after inserting new batteries, first, ensure the connection to the computer is secure. Then, test the responsiveness of the buttons by clicking them. Finally, confirm smooth tracking by moving the mouse on various surfaces. This testing procedure helps ensure the mouse operates smoothly after battery replacement.